For many golfers, the dream of a home golf simulator feels expensive. High-end builds can top $12,000, and some setups rival professional golf studios. But the truth is: you can build a functional, enjoyable home golf simulator for under $5,000 — without sacrificing accuracy or fun.
This guide walks you through step-by-step budget planning, essential components, setup tips, and common pitfalls. By the end, you’ll understand exactly how to create a simulator that fits your garage or spare room — and your wallet.
Step 1: Define Your Budget Goals
Before buying any equipment, get clear on what your $5,000 budget covers.
Key questions to answer:
- Do you want practice-focused accuracy or full virtual course play?
- What space do you have: garage, basement, or spare room?
- Will you start with a tablet or laptop display, or plan to add a projector later?
- Are you willing to DIY parts of the enclosure or mats to save costs?
Budget tip: Most budget simulators spend 40–60% of total cost on the launch monitor alone. Plan the rest for mats, screens/nets, and software.
Step 2: Choose Your Launch Monitor Wisely
The launch monitor is the heart of your simulator. On a budget, focus on:
- Accurate ball speed, launch angle, and carry distance
- Compact size for smaller rooms
- Software compatibility with your chosen simulator app
Budget-friendly options to consider:
- SkyTrak – reliable, compact, works with multiple software options
- Mevo+ – smaller, radar-based, great for swing feedback
- Uneekor Eye Mini – camera-based, slightly higher price but includes more data points
Tip: Don’t overspend on a monitor that exceeds your space’s ceiling height or room depth.
Step 3: Pick a Hitting Surface
A good mat improves both practice quality and equipment longevity.
Key considerations:
- Size: 3’x5’ is typical for home setups
- Thickness: 1–1.5” for shock absorption and realistic turf feel
- Durability: look for high-density fibers that won’t flatten quickly
Budget options:
- TrueStrike hitting mat – compact and forgiving on wrists
- Fiberbuilt Hitting Mat – durable, cost-effective, compatible with most launch monitors
Pro tip: Your mat is more important than fancy flooring — don’t skimp here.
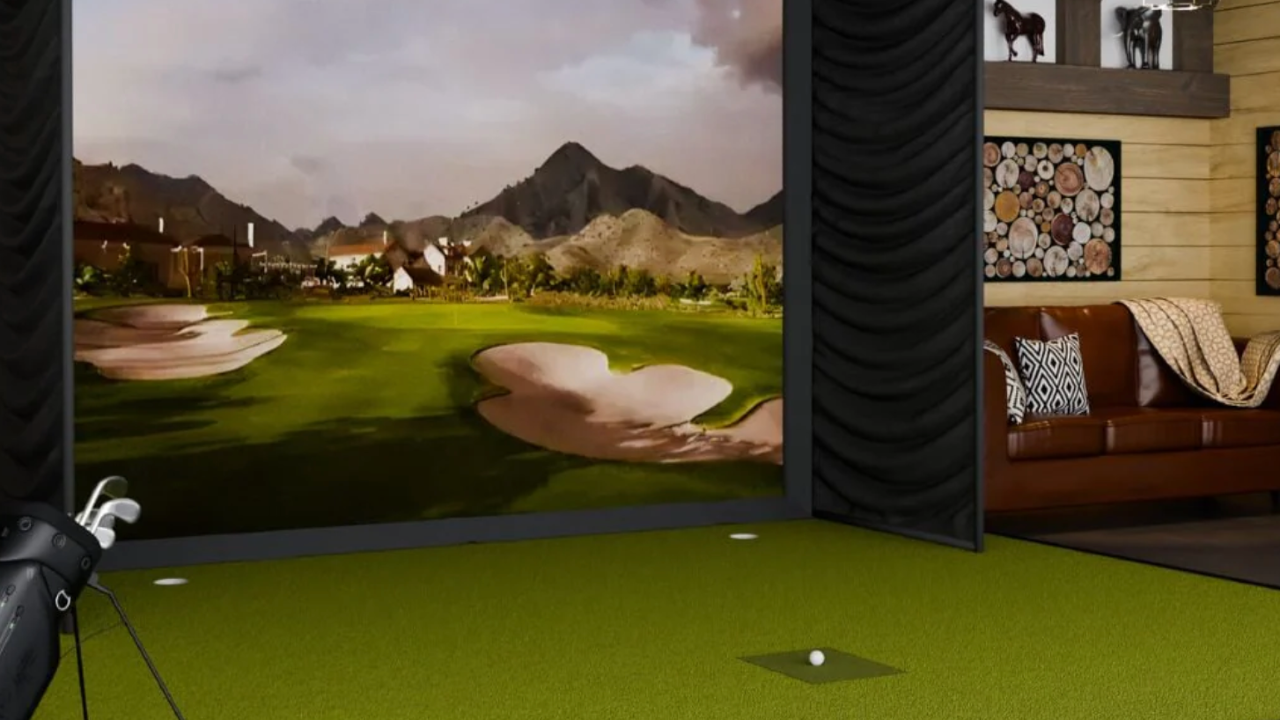
Step 4: Decide Between Screen or Net
On a budget, you have two main options:
1. Net setup:
- Low cost: $150–$400
- Works for swing practice and short shots
- Easy to install in any room
2. Impact screen:
- Higher cost: $400–$900 for entry-level
- Supports short-throw projectors and software
- Provides a full virtual course experience
Recommendation: If space allows, go for a small impact screen. If you’re tight on room, start with a net and upgrade later.
Step 5: Software & Apps
Simulator software makes your setup feel like a real indoor golf experience. Budget-friendly software options:
- The Golf Club (TGC) Home Edition – entry-level pricing, realistic courses
- E6 Connect – compatible with SkyTrak, robust practice modes
- OptiShot 2 – software-only option for budget monitors
Tip: Free apps can help you start, but even $200–$400 for software will improve experience dramatically.
Step 6: Display Options
Your display can be simple or advanced:
- Tablet/laptop: $0–$500 if you already own a device
- Projector: $500–$1,000 for short-throw projectors suitable for garages
- TV: Optional for smaller rooms; ensures clear visibility of shot data
Pro tip: On a budget, use what you already own and plan to upgrade the projector later.
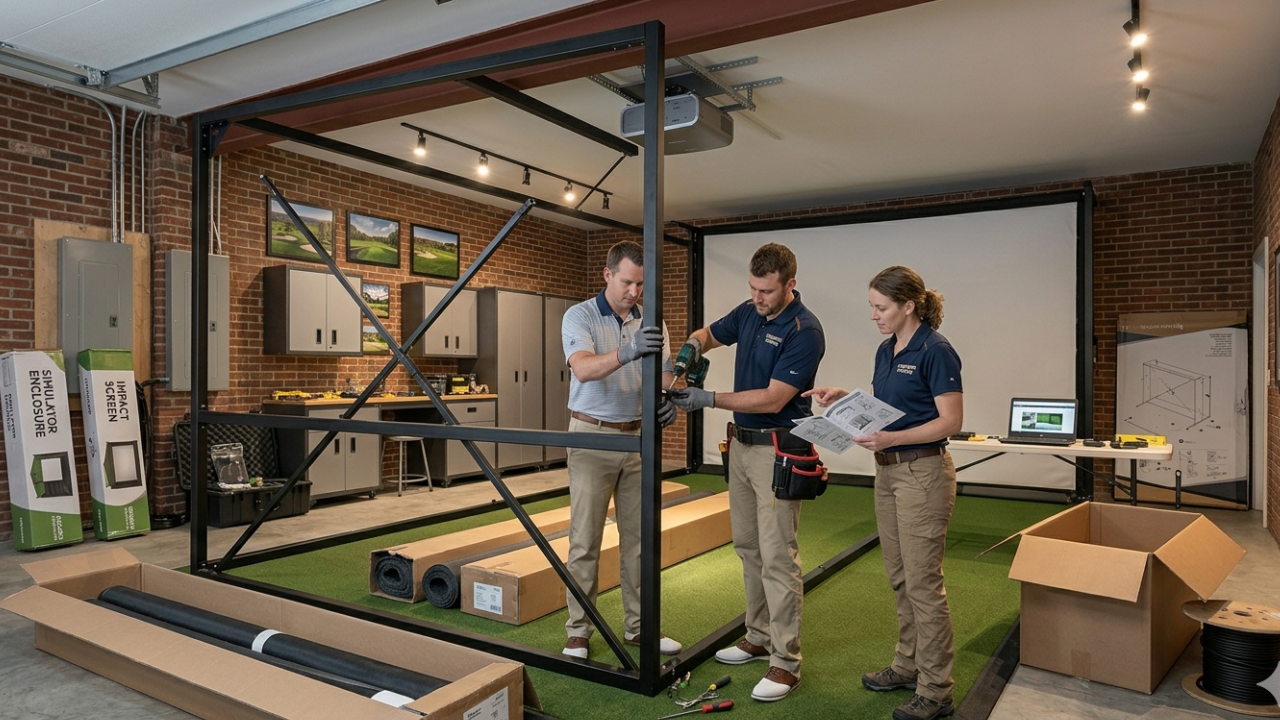
Step 7: Enclosure and Room Prep
Even a budget build needs a basic enclosure:
- DIY frame with PVC or wood for <$100
- Hang netting or impact screen
- Consider wall padding for safety
Budget hacks:
- Repurpose old curtain rods or shelving brackets
- Use high-density foam for side walls
- Add lighting with inexpensive LED strips
Step 8: Optional Accessories (If Budget Allows)
- Alignment rods for swing practice
- Club sensors (like Garmin Approach or Zepp)
- Golf balls for indoor use (soft foam or low-compression balls)
- Small projector screen for a more immersive experience
Focus on essentials first; accessories can be added later.
Step 9: Sample Budget Breakdown (Under $5,000)
Launch monitor $1,500 – $2,500
Hitting mat $300 – $900
Net or entry-level impact screen $200 – $800
Software $200 – $400
Display (tablet/laptop/projector) $0 – $500
Enclosure/DIY setup $100 – $200
Total**$2,300 – $5,000**
This creates a functional home golf simulator without exceeding $5,000.
Step 10: Tips for Saving Money Without Sacrificing Quality
- Buy used launch monitors or projectors
- DIY your enclosure with PVC or wood frames
- Start with a net instead of a full impact screen
- Use existing tablets or laptops
- Prioritize mat quality over aesthetics
Small savings on secondary items can free up budget for the launch monitor, which matters most.
Step 11: Common Mistakes to Avoid on a Budget
- Buying incompatible components – check software/hardware compatibility
- Underestimating space requirements – ceiling and depth are crucial
- Skipping mat quality – cheaper mats can cause injury
- Neglecting lighting – avoid dim or uneven light affecting tracking
- Overcomplicating setup – start simple and upgrade later
Step 12: Example Budget Builds from Our Directory Listings
- SkyTrak Home Simulator Bundle – ideal for $3,000–$5,000 setups
- Mevo+ Entry Package – radar-based, compact, fits garages
- Uneekor Eye Mini Starter Kit – more expensive but gives deeper data for practice
Each of these options is reviewed and compared in our directory, making it easy to see what works for your space.
Step 13: Garage vs Spare Room Considerations for Budget Builds
Garage setup:
- Pros: higher ceilings, deeper rooms, easy ventilation
- Cons: temperature fluctuations, lighting adjustments needed
Spare room setup:
- Pros: controlled temperature, quieter environment
- Cons: space limitations, projector and screen constraints
Tip: Our article Garage vs Spare Room: Choosing the Best Space for Your Home Golf Simulator goes deeper into this decision.
Step 14: Ongoing Costs After Setup
Even budget builds have small recurring costs:
- Software updates/subscriptions: $200–$400 per year
- Replacement balls: $20–$50 annually
- Mat maintenance: ~$50 per year
Budget these for realistic cost planning.
Step 15: Final Thoughts
Building a home golf simulator under $5,000 is entirely possible with planning, smart choices, and a focus on essentials.
Remember:
- Prioritize the launch monitor and mat
- Start with a simple enclosure and upgrade over time
- Match your setup to your space
- Avoid overspending on minor accessories
With the right approach, you can enjoy year-round golf practice, accurate swing feedback, and virtual course play — all without going over budget.